

Introduction
In 2020, Raspberry Pi released a new High Quality Camera1 which unlike previous cameras doesn’t come attached to a lens. Instead the camera sports a standard CS-mount2 thread to which a variety of lenses can be attached.
![[High Quality Camera]](hqc-2.jpg)
Most of the recommended lenses are fairly small, and have focal lengths less than 50mm. This article explores lenses for Canon (D)SLR cameras which have significantly longer focal lengths, and can thus resolve small objects further away. Such lenses are big and quite heavy, so you’ll probably need to use a tripod, and indeed a better tripod mount than provided by the HQ camera itself. A longer ribbon cable between the camera and the Raspberry Pi is also convenient.
Most contemporary Canon DSLR cameras use the EF-mount3 standard which mandates that the aperture is controlled electronically by the camera. Normally this is very convenient, but the lack of manual control is frustrating if you’re using the lens without a Canon camera. Happily earlier FD-mount4 lenses are still available in the second-hand market and are entirely mechanical. This makes them easy to adjust manually, and thus more suitable than EF lenses for our application. They’re also a lot cheaper than newer lenses.
Many third parties made FD-mount lenses and some are available at even lower prices than those made by Canon. I stuck to Canon for the shorter focal lengths, but tried some exotic long lenses too.
The High Quality Camera
The High Quality Camera5 is based around the Sony IMX477R6 sensor. The sensor has 4056 x 3040 active pixels, or about 12.3M pixels in total. Each pixel is 1.55µm square, which corresponds to a diagonal of about 7.9mm.
As a point of comparison with other cameras, it might be helpful to compare this sensor to those in DSLR (and similar) cameras. Let’s begin with the sensor’s size. Wikipedia has a helpful page7 which shows the sizes of sensors used in many different cameras. Of particular note is the 35mm ‘full-frame’ sensor which matches the 35mm SLR film standard, and is a benchmark for photographers. This sensor has a diagonal of about 43mm so it’s about 5.4 times the linear size of the HQ camera’s sensor and covers nearly thirty times the area.
To see the consequences of this, imagine taking a photo with a 50mm lens on a full-frame camera. If we now replace the sensor with the one from the HQ camera, then most of the image will fall outside the sensor. Put another way, the field-of-view of the HQ camera will be much smaller than for the full-frame sensor: it will see about 18% of the image size (or about a thirtieth of the area).
Roughly speaking, a 50mm lens on the HQ camera will thus show the same view as a 270mm lens on the full-frame camera. As another example, if someone recommends that you should use a 50mm lens on a full-frame camera to get a particular composition, on the HQ camera you should use a 10mm lens instead. More excitingly, a relatively normal 200mm lens on the HQ camera will have a similar reach to a 1000mm lens on a full-frame sensor.
It’s also useful to compare the pixel size of the sensors. The current top-end sensors from Canon and Sony have about 30M and 61M pixels spread across a full-frame sensor, or equivalently have 5.4µm and 3.7µm pixels. Bigger pixels mean less resolution for a given sensor size, but they collect more light so we’d expect them to have better performance in low-light.
Finally, suppose we took photographs with the HQ camera and 100mm lens, and with the Sony full-frame camera and 500mm lens. As discussed above, these should have similar fields of view but the Sony sensor divides the image into 60M pixels to the HQ camera’s 12M: we can think of each pixel on the HQ camera as equivalent to 2.3 x 2.3 pixels on the Sony. The Sony system is likely to be a lot better in other ways too, but it will also be vastly more expensive.
CS and C mounts
In mechanical terms two things matter about the mount: how does it attach to the lens, and how much distance lies between the sensor and the back of the lens—the flange focal distance (FFD)8.
The HQ camera has a CS-mount9 which takes the form of a 1" diameter thread with 32 threads per inch, and a FFD of 12.526mm.
The same thread is used for the C-mount10, but the FFD is longer: 17.526mm. To attach a C-mount lens to a CS-mount body is easy: just use a 5mm extender.
If you screw a C-mount lens directly to a CS-mount body like the HQ camera, it will appear to work, but you’ll probably find it impossible to focus the lens properly.
Canon FD lenses
As mentioned in the introduction, I think Canon FD lenses11 are a great choice for the HQ camera. They are totally mechanical, which makes it easy to adjust things manually, and readily availble at good prices on eBay12. All the lenses I bought worked, though some would benefit from cleaning.
The FFD for FD lenses is 42mm, comfortably longer than both the C- and CS-mount standards so the adapter needs only to have the right mountings and to hold the lens the right distance away from the sensor.
I couldn’t find FD- to CS-mount adapters, but FD- to C-mount adapters are plentiful. Remember to use the 5mm ring to convert the native CS-mount of the HQ camera to C-mount. Without it, the converter will fit, but it’s likely that you won’t be able to focus.
![[FD-mount adapter fitted to camera]](hqc-3.jpg)
Attaching the lens
I’m not sure if it’s a lack of familiarity, but I found the FD lenses to be much fiddlier to attach to a camera body than Canon’s newer EF lenses.
For most FD lenses, the key is to align the three flanges on the body/adapter with the lens, then rotate the lens and body relative to each other until you hear and feel the lens lock. To unlock things there’s usually a button on the lens.
One of the flanges is larger, has a small stud on the lens, and is marked by a red dot. If these aren’t aligned, you need to rotate the inner part of the lens to fix it.
![[FD-mount lens]](hqc-1.jpg)
The FD- to C-mount converters I bought have a ring on them which is labelled “Lock ⟷ Open”. This unlocks the aperture and has nothing to do with attaching the lens to the body. I think it should be in the “Open” position when you’re attaching the lens, then moved to the “Lock” position to unlock the iris.
Some older lenses have a loose silver ring which you rotate to attach the lens. On such lenses the lens and body don’t rotate with respect to each other.
There are plentiful YouTube videos showing all this, and good articles too. I liked one on Tom’s Digital Photography13.
Aperture lock
Although the FD lens is mechanical, the aperture ring only affects the aperture when the lens is attached to a body. I think you can unlock it by cunningly pressing the right spots on the lens, but it’s easier to just mate it with the adapter. Sometimes you have to rotate a ring on the adapter to unlock the iris.
It’s worth remembering this if you buy a lens and think the aperture control is broken.
Lens hoods
It always seemed to me that old books on photography made too much fuss about lens hoods. Having now played with some older lenses, I realise that modern optical coatings are completely amazing, and if you use lenses without them you really do need to worry about stray light falling on the surface of the lens.
Using uncoated lenses without a hood usually gives washed out, poor contrast, images.
FD lenses on EF bodies
Having found some splendid old lenses, I was naturally interested to try them on a modern Canon body too.
The FFD for EF lenses is 44mm, 2mm longer than for FD, and the problem is exacerbated by the finite thickness of the adapter which adds 5–10mm. To make things work properly you need an extra lens in the adapter: without it you won’t be able to focus properly.
Such adapters exist, but are obviously more expensive than those without optics. Sadly adapters without optics also exist, so care is needed when buying them.
Canon EF lenses
For completeness, I include a few notes about using EF lenses on the HQ camera.
As with FD lenses, the FFD (44mm) is longer than for a CS- or C-mount, so no optics are required in the adapter. Again the adapters seem to target C-mounts, so you’ll need the extension tube.
Most EF lenses support manual focus, so the only problem is controlling the aperture.
There is at least one open-source project which tries to control the lens: Jan Henrik Hemsing’s EF-S-Adapter14. Other information is scattered15 around16 the17 Internet18. At least some people claim to have damaged lenses doing this, so proceed at your own risk.
If you could get all this to work without letting the magic smoke out, you could get the Raspberry Pi to actually control the lens without manual intervention. That sounds like a cool project!
Sample image
The image below shows a Lego minifigure19 taken from about 20m away using a 400mm Prinz Galaxy lens which I bought on eBay for about £35. Even on a reasonable tripod, aligning and focussing this was a bit tricky using the 7" Raspberry Pi display, but I was delighted with the result.
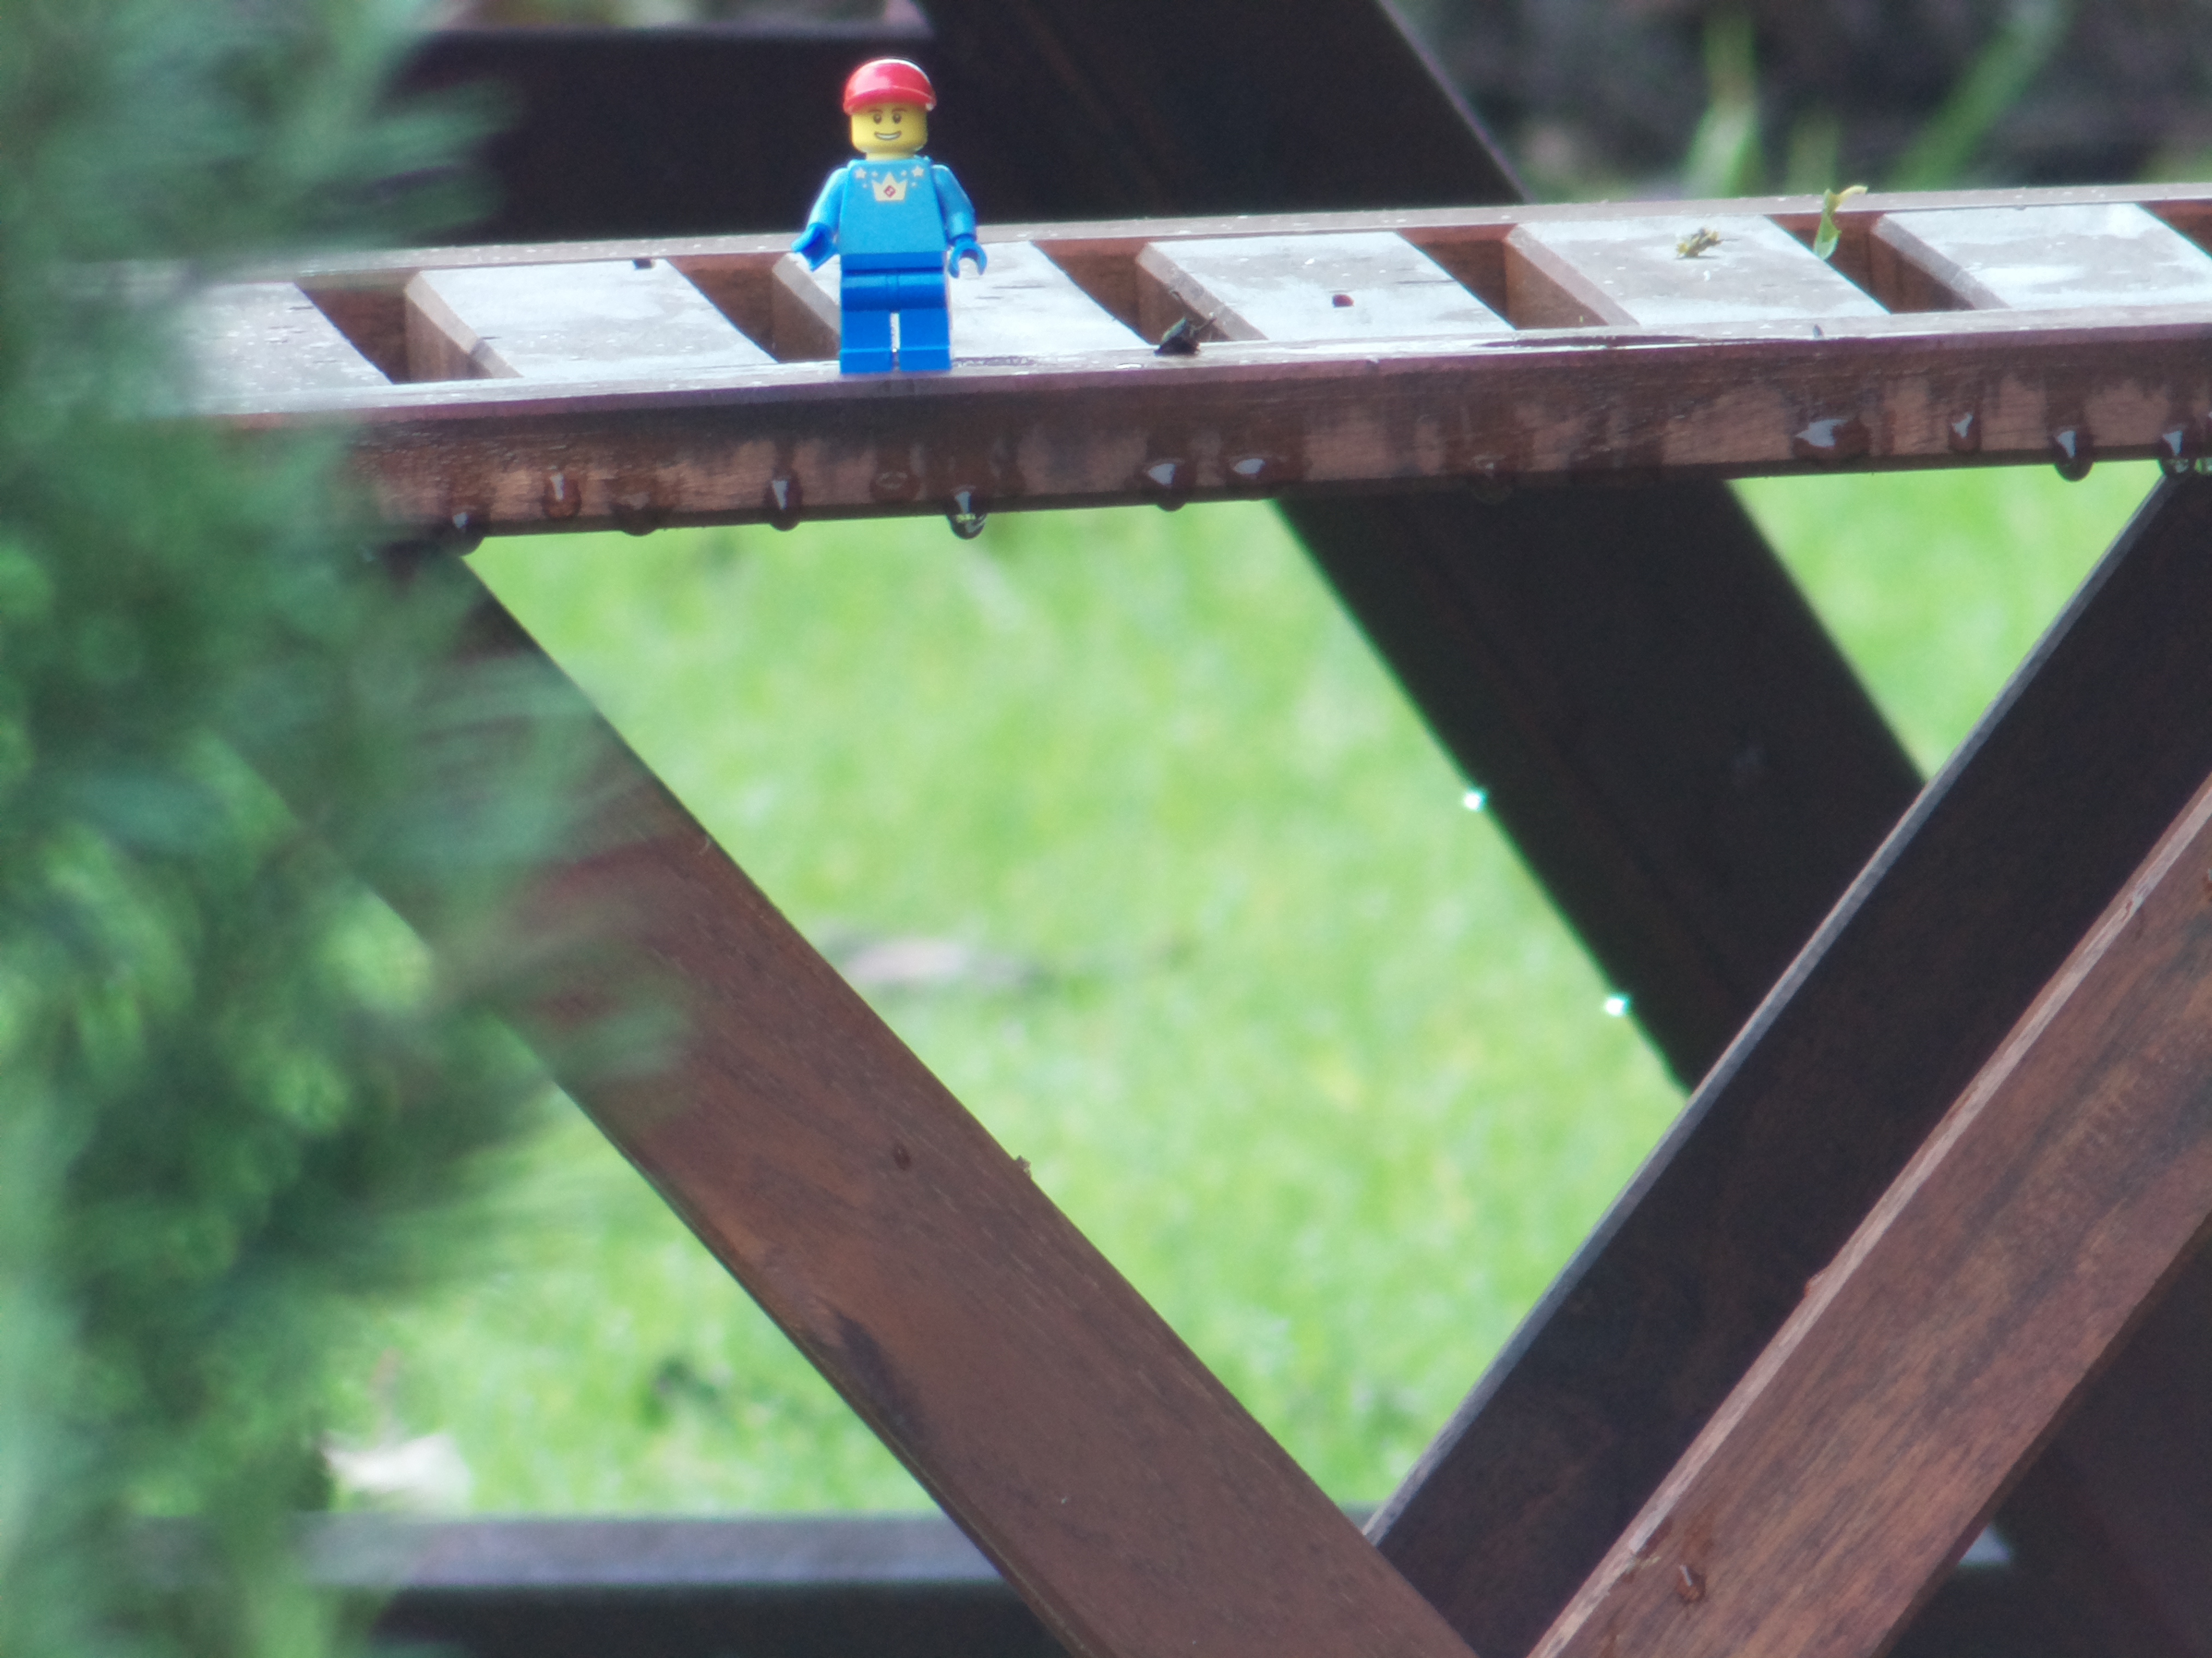
Even if we crop the image, it is still relatively sharp; you can clearly see the figure smiling:

Conclusions
Putting a nice lens on the High Quality Camera makes it a lot more versatile, and lets you capture a wider ranges of images. Although relatively old, FD-Mount lenses are a relatively inexpensive way to explore this.
References
- 1. https://www.raspberrypi.org/products/raspberry-pi-high-quality-camera/
- 2. https://en.wikipedia.org/wiki/C_mount#CS_mount
- 3. https://en.wikipedia.org/wiki/Canon_EF_lens_mount
- 4. https://en.wikipedia.org/wiki/Canon_FD_lens_mount
- 5. https://www.raspberrypi.org/products/raspberry-pi-high-quality-camera/
- 6. https://www.sony-semicon.co.jp/products/common/pdf/IMX477-AACK_Flyer.pdf
- 7. https://en.wikipedia.org/wiki/Image_sensor_format
- 8. https://en.wikipedia.org/wiki/Flange_focal_distance
- 9. https://en.wikipedia.org/wiki/C_mount#CS_mount
- 10. https://en.wikipedia.org/wiki/C_mount#CS_mount
- 11. https://en.wikipedia.org/wiki/Canon_FD_lens_mount
- 12. https://www.ebay.co.uk/sch/i.html?_nkw=canon+fd+lens
- 13. http://cholla.mmto.org/photography/gear/canon_fd/introduction.html
- 14. https://github.com/Jan--Henrik/EF-S-Adapter
- 15. https://pickandplace.wordpress.com/2011/10/05/canon-ef-s-protocol-and-electronic-follow-focus/
- 16. https://www.dslr-forum.de/showthread.php?t=649529
- 17. https://www.dslr-forum.de/showthread.php?t=649529&page=61
- 18. http://oliford.co.uk/phys/canon-lens-protocol/
- 19. https://en.wikipedia.org/wiki/Lego_minifigure
![[ Atom Feed ]](../../atom.png "Atom Feed")