

Update 2018-07-11: Added note about Pi model, evdev installation, and gamma correction. Update 2018-08-02: Deprecated QR varient of HAP python.
Introduction
The article describes how to make a very simple light which you can control through Apple’s HomeKit1 service.
It is very much a proof of principle, rather than a practical device, and all the hard work has been done by other people!
Hardware
The key element in the project is a Raspberry Pi with an internet connection. Originally I used an old Model A, but I found this often led to ‘Accessory not responding’ errors. In practice a Pi Zero W worked much better.
The notes below assume you’ve set up the Pi roughly along these lines2.
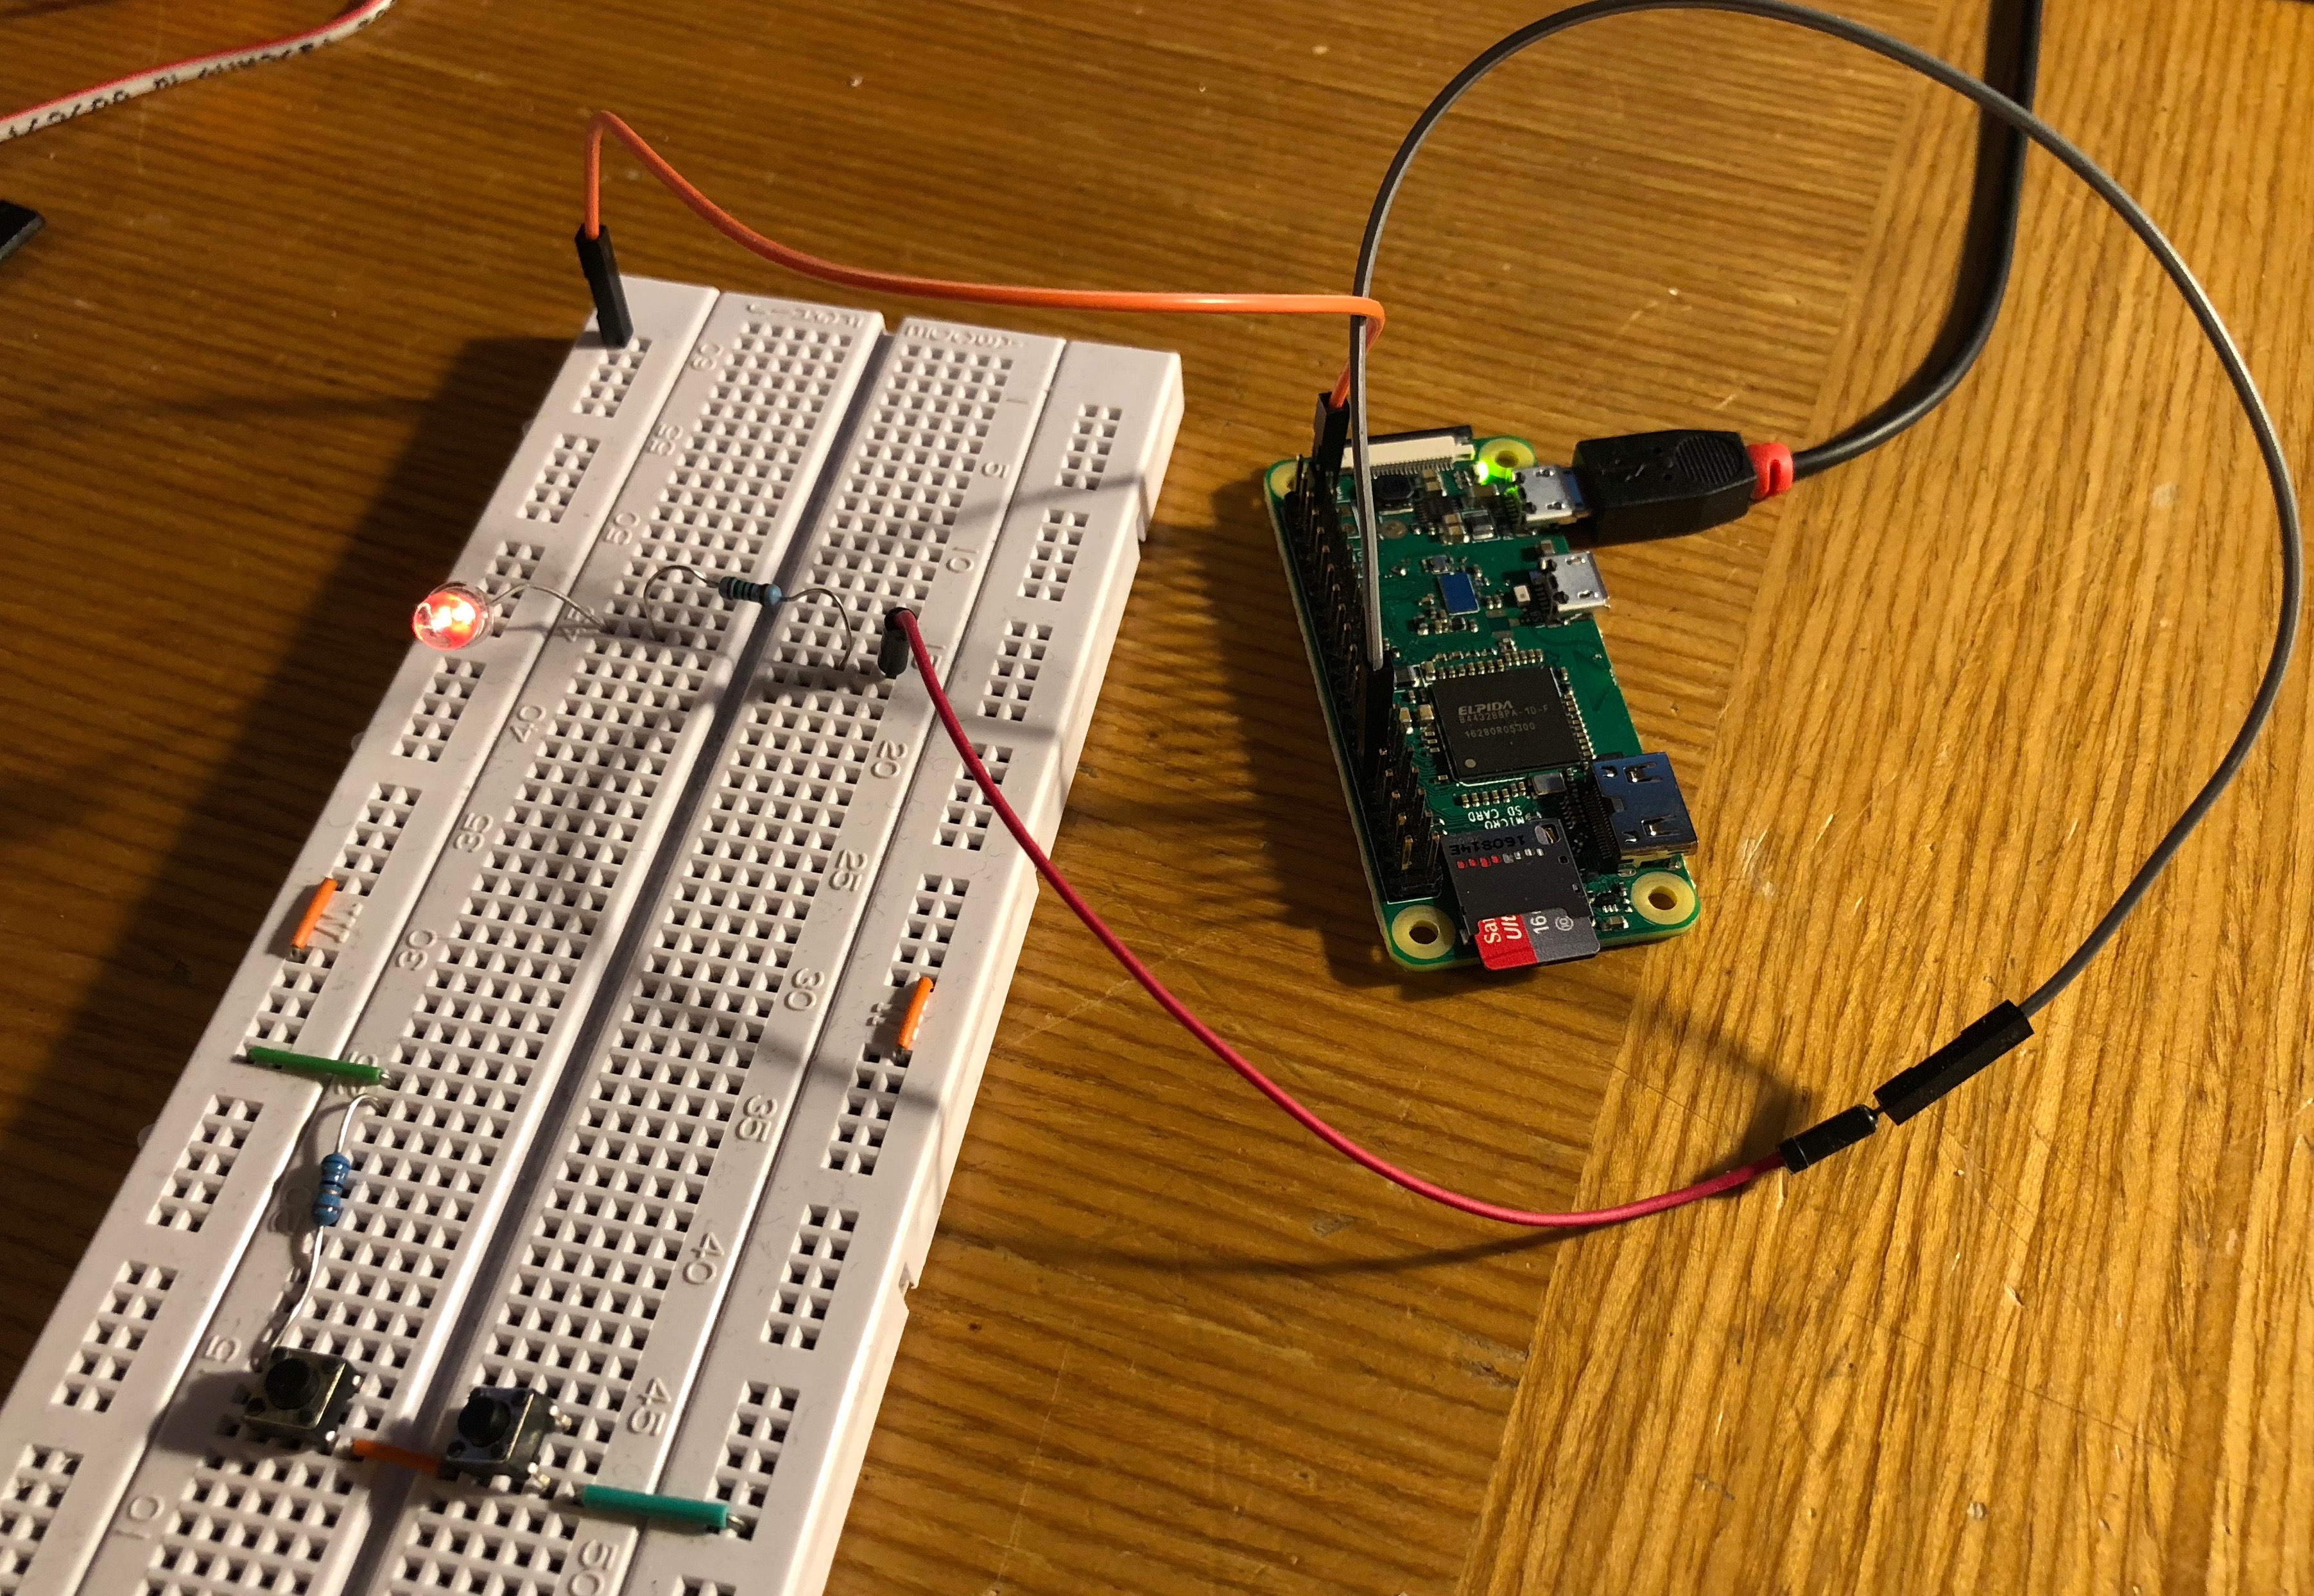
The next part of the hardware is to connect an LED to GPIO 18.
If you’ve installed the gpiozero package, you can identify pin 18 with the pinout command.
And that’s the hardware done! You can see my version, cobbled together with stuff lying within easy reach on my desk:
 3
3
Testing
To test the hardware do this (note that you shouldn’t need to be root):
$ echo 18 > /sys/class/gpio/export
$ echo out > /sys/class/gpio/gpio18/direction
$ echo 1 > /sys/class/gpio/gpio18/value
$ echo 0 > /sys/class/gpio/gpio18/value
You should see the LED turn on, then off.
PWM support
Of course, any self-respecting light these days can be dimmed, so we should add that. Happily we can use the PWM drivers built into the kernel. To do this, edit /boot/config.txt and add this line:
dtoverlay=pwmNow reboot the machine.
The runes above tell the Raspberry Pi to use a devicetree overlay to set up a pulse-width modulation4 device on GPIO pin 18. If you want to know more about this you might find an article I wrote about devicetree5 interesting.
If you just want to use control the LED though, you just need to know about the sysfs interface:
$ echo 0 > /sys/class/pwm/pwmchip0/export
$ echo 1000000 > /sys/class/pwm/pwmchip0/pwm0/period
$ echo  500000 > /sys/class/pwm/pwmchip0/pwm0/duty_cycle
$ echo 1 > /sys/class/pwm/pwmchip0/pwm0/enable
$ echo  900000 > /sys/class/pwm/pwmchip0/pwm0/duty_cycle
$ echo  100000 > /sys/class/pwm/pwmchip0/pwm0/duty_cycle
The units above are all nanoseconds, and so these commands:
- Set up a 1kHz signal on GPIO18;
- Initially set the signal on 50% of the time;
- Change this faction to 90%, then 10%.
One of the nice features about all this, is that we have been able to handle all the hardware by just configuring the standard kernel software. This leaves our application code free from any need to talk directly to hardware, free from any need to have elevated permissions, and free to run without significant timing constraints
The HomeKit Accessory Protocol
These days, it is relatively easy to see the official documentation6 from Apple. There are still hoops to jump through if you want to do this commercially, but those don’t concern us here.
Now, actually implementing the Protocol from scratch is a major task but happily someone has done it: Ivan Kalchev’s HAP-python7 library. Thank you Ivan!
I should say that there are other similar projects: some in python, many more in Javascript. Home Assistant8 uses HAP-python though, and that’s enough to break the symmetry for me.
To install HAP-python:
$ sudo apt-get install libavahi-compat-libdnssd-dev
$ pip3 install HAP-python
Sadly this can take quite a lot of time.
Previous versions of this post used the QR version of HAP-python which displays the pairing code in a pretty QR-code which the iPhone can read. It is great on the command line, but awful if it gets sent to syslog.
Our software
Having used existing software to control the LED and to talk to HomeKit, we now need to write some code to connect the two. Happily it is all very straightforward.
lamp.py
Let’s begin with the main program:
import sys
sys.path.append('lib')

import logging
import signal

from pyhap.accessory_driver import AccessoryDriver

from LightBulb import LightBulb

logging.basicConfig(level=logging.INFO)

driver = AccessoryDriver(port=51826)

lamp = LightBulb(driver, 'ToyLamp')
driver.add_accessory(accessory=lamp)

signal.signal(signal.SIGTERM, driver.signal_handler)

driver.start()
This code is based heavily on the example9 in the HAP-python repository. In essence, it just instantiates the accessory, the driver, then tells the driver to get on with it.
Lightbulb.py
Although this is the largest bit of new code, it is hardly enormous. Happily the HAP-python repository includes an example LightBulb10 accessory: the chief differences below are:
- I want to be able to dim the bulb so there’s a new Brightness characteristic.
- The LED is attached to a PWM device which is controlled via the sysfs API, rather than a binary GPIO line.
from pwm import PWM

from pyhap.accessory import Accessory
from pyhap.const     import CATEGORY_LIGHTBULB

class LightBulb(Accessory):

    category = CATEGORY_LIGHTBULB

    def __init__(self, *args, pwm_channel=0, **kwargs):
        super().__init__(*args, **kwargs)

        chars = [ ( 'On',         self.set_on )
                , ( 'Brightness', self.set_brightness )
                ]

        server = self.add_preload_service(
            'Lightbulb', chars = [ name for (name,_) in chars ])

        for (name, setter) in chars:
            server.configure_char(name, setter_callback = setter)

        self.pwm_channel = pwm_channel
        self.brightness  = 1.0  # fraction
        self.is_on       = False

        # Initialize this now, so that it has time to initialize
        # properly before we call it
        self.pwm_device  = PWM(self.pwm_channel)
        self.pwm_device.export()

    def set_on(self, value):
        self.is_on = bool(value)
        self.set_bulb()

    def set_brightness(self, value):
        # HAP spec says brightness is specified as a percentage
        self.brightness = float(value) / 100.0
        self.set_bulb()

    # push local state to PWM
    def set_bulb(self):
        if self.is_on:
            self.set_pwm_state(self.brightness)
        else:
            self.set_pwm_state(0)

    # actually drive PWM device
    def set_pwm_state(self, f):
        pwm_period = 1000000 # 1ms = 1000000ns => 1kHz

        self.pwm_device.period     = pwm_period
        self.pwm_device.duty_cycle = int(f * pwm_period)
        self.pwm_device.enable     = True

    def stop(self):
        super().stop()
pwm.py
To access the PWM sysfs API, I’m using code written by Scott Ellis. You can get his original from GitHub11
The only local difference is that I added code to wait for the PWM device to be exported: particularly on older hardware, this seems to take a while. A better patch might check that the udev rules which fix the PWM device permissions have had time to fire too.
    ...

    def export(self):
        """Export the channel for use through the sysfs interface.
        Required before first use.
        """
        if not self.is_exported():
            with open(self.base + '/export', 'w') as f:
                f.write('{:d}'.format(self._channel))

        # wait for the device to appear, so that immediate attempts
        # to configure it don't fail
        max_wait = 10.0  # in seconds
        sleepq   =  0.1  # in seconds
        timeout = time.clock() + max_wait
        while not self.is_exported():
            if time.clock() > timeout:
                raise TimeoutError("Unable to export PWM device")
            time.sleep(sleepq)

    ...
Basic operation
As you’ll know if you’ve used HomeKit before, you have to add new accessories to the system. Happily HAP-python makes this easy: the first time the accessory is run, it displays a QR code on the command line, which the Home app on your iPhone understands.
Our accessory isn’t certified, so you have to explicitly approve it.
The AccessoryDriver persists its state in a local file, by default called accessory.state, so subsequent invocations of the accessory don’t go through the pairing routine and generate the QR code. If you should need to re-pair the accessory, delete the state file.
systemd
Having paired the accessory, you will probably want to start it automatically when the system boots.
To do this, we use systemd12. Specifically, with this script:
[Unit]
Description="HomeKit Lamp"

[Service]
Type=simple
User=pi
WorkingDirectory=/home/pi/mjo-homekit/code
ExecStart=/usr/bin/python3 /home/pi/mjo-homekit/code/lamp.py
StandardInput=null
StandardOutput=syslog
StandardError=syslog
Restart=on-failure

[Install]
WantedBy=multi-user.target
I don’t claim this is optimal, but it appears to work. Some caveats:
- It is not robust with respect to the network disappearing and reappearing.
- It runs as the standard pi user: it would be better to set up a new one.
Local control
Although it’s handy to be able to control the light from the Internet, I think it’s helpful to have controls on the light too.
When I last built an IoT light13 I included a combined push-button and rotary-encoder to control both brightness and whether the light was on. Unsurprisingly, I’ve now replaced the software I wrote then with this HomeKit version, and so I want similar local controls.
 14
14
Events
Just as it is convenient to use a devicetree overlay to create a PWM device which drives the light, we can also use overlays to create input devices for the rotary-encoder and power button.
I’ve made more detailed notes15, but the key lines to include in /boot/config.txt are:
dtoverlay=gpio-key,gpio=25,label=MYBTN,keycode=0x101
dtoverlay=rotary-encoder,pin_a=7,pin_b=8,relative_axis=1
As you can probably guess, you should connect the rotary-encoder to GPIOs 7 and 8, and the power button to GPIO 25. The overlays enable pull-ups in the processor, so you don’t need extra resistors.
Having installed the overlays and connected the hardware, devices appear in /dev/input/eventN. You can test them with evtest, or talk to them from Python with the evdev library.
Sadly evdev isn’t packaged in raspbian, but you can install it easily with pip3:
$ pip3 install evdevNew code
We need to make several changes to our accessory code: add code to parse the events, add code to push local changes to the HomeKit world, and finally arrange for the code to be called appropriately.
Parsing the events is made simpler because we don’t have to worry about distinguishing different buttons.
async def event_handler(self, dev):
  async for e in dev.async_read_loop():

    # all events _might_ update local state variables...
    t = e.type
    v = e.value

    # key presses toggle state...
    if   t  evdev.ecodes.EV_KEY and v  1:
        self.is_on = not(self.is_on)
        self.local_update = True

    # rotary encoder changes brightness (and turns light on)...
    elif t == evdev.ecodes.EV_REL and v != 0:
        if not self.is_on:
            self.is_on = True
            self.local_update = True

        b = clamp(0, 1.0, self.brightness + v * self.bri_delta)

        if self.brightness != b:
            self.brightness = b
            self.local_update = True

    # if the state has changed push those changes to the bulb
    if self.local_update:
        self.set_bulb()
You’ll see that this code is marked async16 which marks it as an asynchronous coroutine. This makes it easy to integrate into the main AccessoryDriver code. In the init method just add:
for d in evdevs:
  driver.async_add_job(self.event_handler(d))
Where evdevs is a list of devices passed to the accessory when it’s created.
To push changes back to HomeKit, we use another async event, though HAP-python provides some syntactic sugar to make the code a bit sweeter:
@Accessory.run_at_interval(1)
def run(self):
    if self.local_update:
        self.char['On'].set_value(self.is_on)
        self.char['Brightness'].set_value(int(100.0 * self.brightness))
        self.local_update = False
Note that we only push updates if there are any changes: this both reduces spurious traffic and stops local and remote updates from fighting.
Improvements
In practice, setting the PWM duty-cycle to the fractional brightness gives very crude control at low levels, and the perceived change in intensity isn’t consistent. Better results comes from employing gamma correction17, here with γ = 2.5:
# push local state to PWM
def set_bulb(self):
    if self.is_on and self.brightness > 0:
        theta  = self.brightness ** 2.5
        self.set_pwm_state(theta)
    else:
        self.set_pwm_state(0)
GitHub
You can get all the code for this from GitHub18.
Conclusions
This project worked well: the final light works reliably, integrates seemlessly into the Apple HomeKit ecosystem, and the whole process wasn’t particularly difficult.
Much of the credit for this goes to Ivan Kalchev’s HAP-python library, which does all the heavy-lifting. Abstracted a little, you can see it as yet another nice project enabled by cheap commodity electronics and fine open-source software.
I think some credit is also due to Apple though. By placing HomeKit devices firmly on the local network, and only allowing remote access through some sort of Hub (e.g. Apple TV or HomePod), Apple have made the security problems much easier. In particular we don’t have to worry about setting up crypto-certificates so as to limit access to the right people.
Overall, then, it was a fun thing to do, and if you’ve got Apple devices around then I recommend you start building your own HomeKit trinkets.
References
- 1. https://www.apple.com/uk/ios/home/
- 2. ./rpi-setup.html
- 3. ./hap-light.jpg
- 4. https://en.wikipedia.org/wiki/Pulse-width_modulation
- 5. ../../2017/03/rpi-devicetree.html
- 6. https://developer.apple.com/support/homekit-accessory-protocol/
- 7. https://github.com/ikalchev/HAP-python
- 8. https://github.com/home-assistant
- 9. https://github.com/ikalchev/HAP-python/blob/master/main.py
- 10. https://github.com/ikalchev/HAP-python/blob/dev/accessories/LightBulb.py
- 11. https://raw.githubusercontent.com/scottellis/pwmpy/master/pwm.py
- 12. https://en.wikipedia.org/wiki/Systemd
- 13. ../..2017/05/yauiotl.html
- 14. ../../2017/05/yauiotl-case.jpg
- 15. ../../2017/03/rpi-devicetree.html
- 16. https://docs.python.org/3/library/asyncio-task.html
- 17. https://en.wikipedia.org/wiki/Gamma_correction
- 18. https://github.com/mjoldfield/mjo-homekit
![[ Atom Feed ]](../../atom.png "Atom Feed")