

Introduction
The Black Magic Probe1 is an open source JTAG and SWD adapter with integrated support for GDB’s remote debugging protocol. Essentially the BMP bridges between your host machine and the target ARM. You just connect it, point gdb at it, and get to work.
As you can see below, the BMP is tiny and connects to the target with cables, which is great for some projects, but I found myself missing the single, solid PCB of STM’s Nucleo and Discovery boards.
 2
2
However, the BMP firmware explicitly mentions ST-Link compatibility3, so I decided to replace the ST-Link firmware on one of my Nucleo boards. Although a lot of helpful information is available online, the process proved to be quite a palaver, so I am making these notes in case I want to do it again. I should add that there’s nothing intrinsically difficult, but I’d forgotten or didn’t know a few things which made it rather frustrating.
The best single article4 about replacing the ST-Link firmware comes from Michael Spieler5 and discusses flashing the Nucleo’s ST-Link from a Discovery board. I wish I’d found this at the start of the job, rather than the end. Thanks to Chuck McManis in the blacksphere/blackmagic Gitter channel for telling me about it.
Tools
I do most of my development on a Mac, so these notes are Mac-centric, though I expect they’d work on Linux without many changes.
As we will discuss below, the standard ST-Link firmware is locked, so whichever tool you use to flash the new firmware must be able to unlock the flash first.
To program ARMs I usually use texane’s stlink6 software to drive the ST-Link hardware, but this can’t do the job. Happily openocd7 can do the job though. So with a nod to symmetry I used a second Nucleo board and openocd to flash the firmware on the target ST-Link.
I think other ARM programmers could also be used: notably the Black Magic Probe itself, or indeed the ST-Link when driven by ST’s official Windows tools.
Building the firmware
This is well documented all over the place e.g. on Piotr Esden-Tempski’s blog8.
Assuming that you have a suitable ARM toolchain already installed:
$ git clone git@github.com:blacksphere/blackmagic.git
$ cd blackmagic
$ git submodule init
$ git submodule update
$ make
$ cd src
$ make clean
$ make PROBE_HOST=stlink
Flashing in detail
The ST-Link part of the Nucleo is based around the STM32F103CBT6 processor. It is flashed with ST’s firmware which provides the ST-Link functionality, and also for a proprietary firmware upgrade feature.
Some work has been done to reverse engineer the update process but it’s not complete. I found articles by Taylor Killian9 and lujji10 instructive: if I wanted to revisit this problem I’d start there.
Instead I think the best approach is to wipe the ST-Link stuff entirely and replace it with the Black Magic Probe firmware. We divide the task into three stages: preparation; flashing; tidying-up.
NOTE: Having wiped the ST-Link firmware, it is difficult to put it back, at least with the tools I found for the Mac. On the other hand, Nucleos are cheap, so I was quite happy to regard this as an irreversible step.
Preparation
Our aim here is to connect the host ST-Link we will use for programming to the target ST-Link. Sadly this requires a soldering iron!
On the bottom of the target ST-Link you need to remove four zero-ohm bridges from the ‘DEFAULT’ positions and make bridges across the four ‘RESERVED’ positions. This connects the four-pin CN2 header to the ARM in the ST-Link rather than the normal target ARM on the Nucleo board.
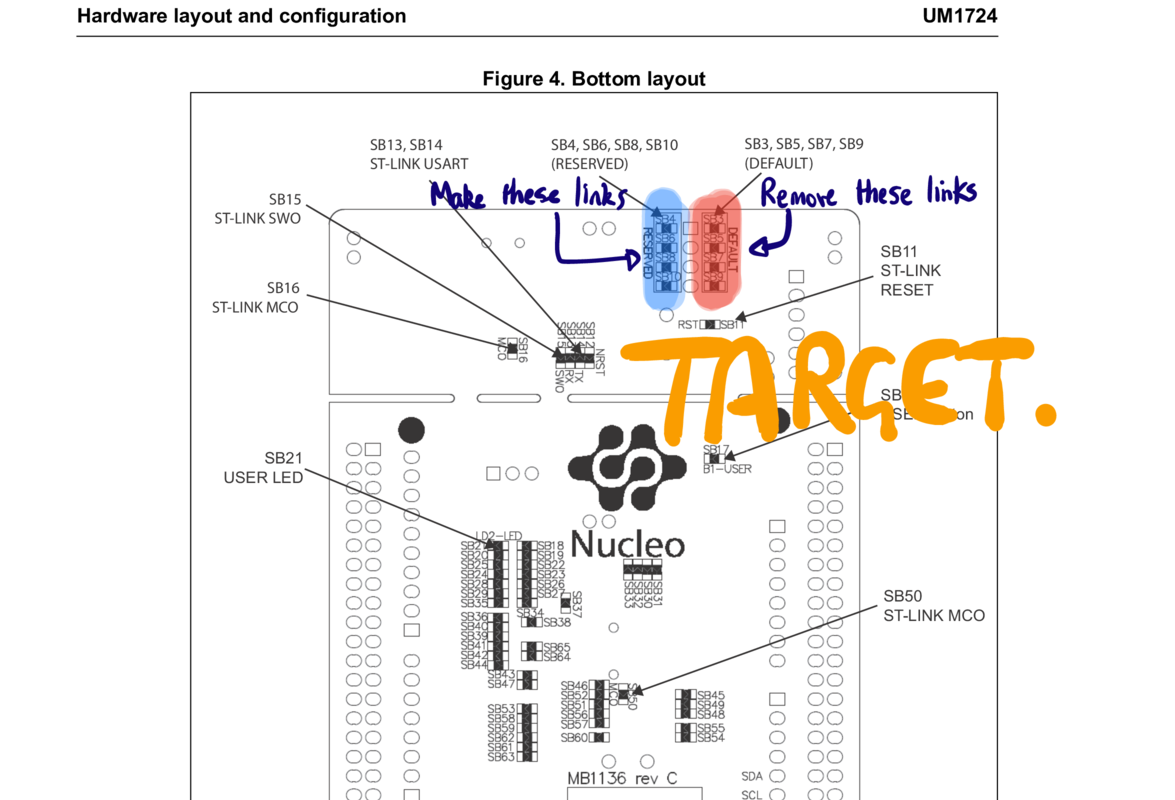 11
11
Having tweaked the links, we now need to connect the target board to the other Nucleo. The four pins on CN2 are the only connections you need: they provide both power and the programming signals. Explicitly, the pins are Vcc, SWCLK, Ground, and SWDIO.
Remove the two jumpers from CN2 and connect four short wires to them instead. Keep the jumpers safe though.
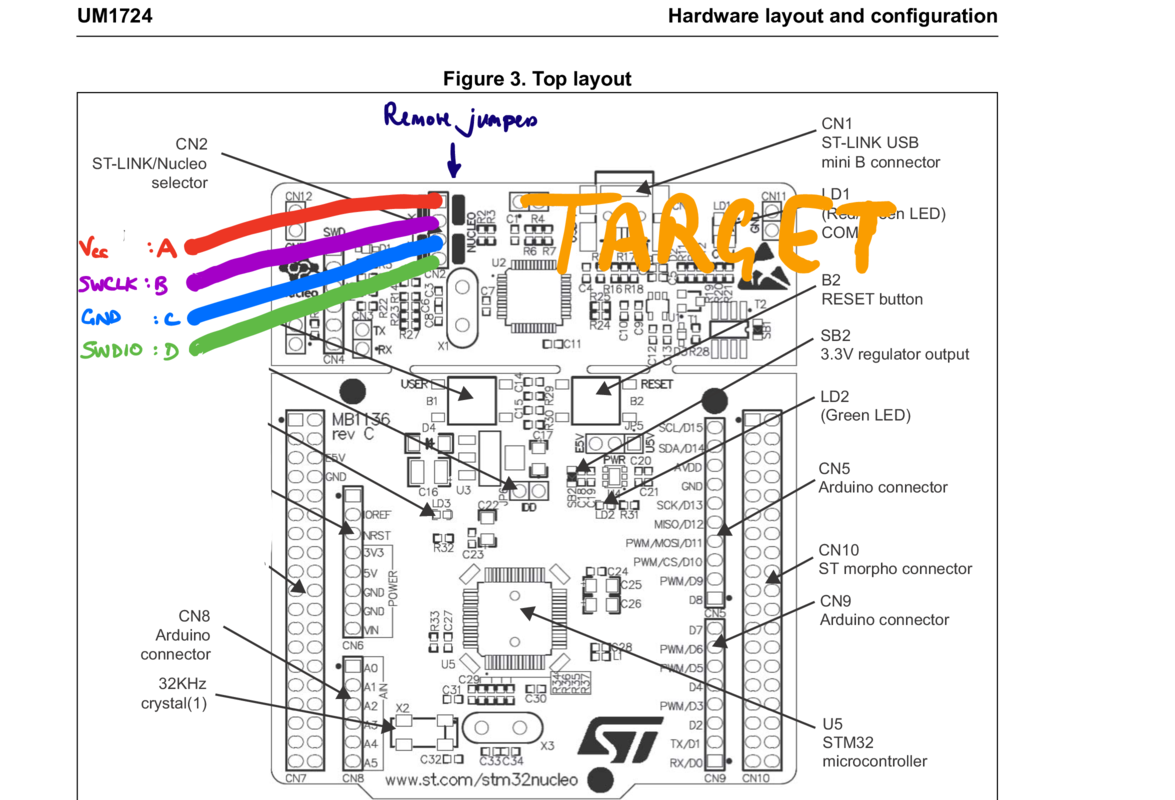 12
12
On the host Nucleo, remove the jumpers from CN2 so that the programming signals aren’t routed to the on-board target. Three of the signals we need come from the six-pin SWD header CN4. We also need a 3.3V rail for Vcc. There are various sources but the safest is probably from the block of power headers.
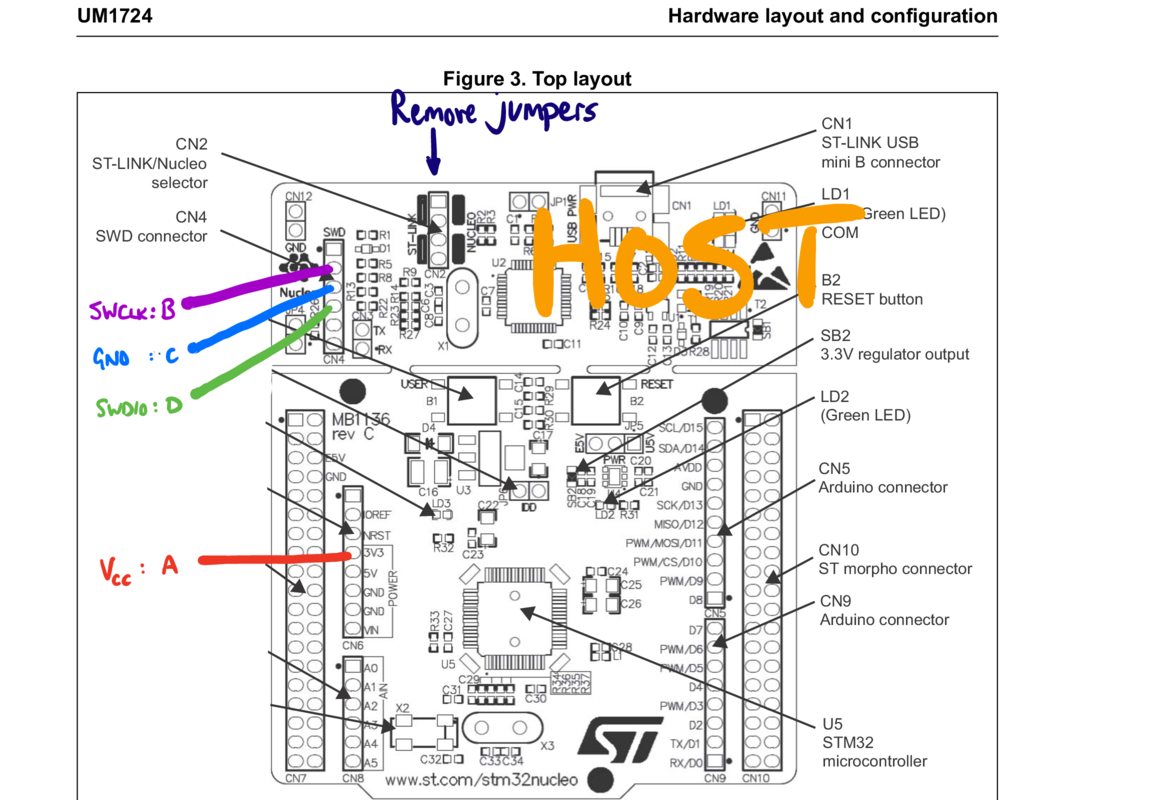 13
13
At this point the hardware is all set-up.
Flashing
Recall that we will use openocd to unlock the flash on the target ST-Link and upload the new firmware. Begin by starting the openocd daemon, here on port 4567:
$ openocd -f interface/stlink-v2-1.cfg -c 'transport select hla_swd'
       -f target/stm32f1x.cfg -c 'telnet_port 4567'
Open On-Chip Debugger 0.10.0
Licensed under GNU GPL v2
For bug reports, read
    http://openocd.org/doc/doxygen/bugs.html
hla_swd
Info : The selected transport took over low-level target ...
adapter speed: 1000 kHz
adapter_nsrst_delay: 100
none separate
Info : Unable to match requested speed 1000 kHz, using 950 kHz
Info : Unable to match requested speed 1000 kHz, using 950 kHz
Info : clock speed 950 kHz
Info : STLINK v2 JTAG v20 API v2 SWIM v4 VID 0x0483 PID 0x374B
Info : using stlink api v2
Info : Target voltage: 3.228402
Info : stm32f1x.cpu: hardware has 6 breakpoints, 4 watchpointsNOTE: The Nucleo needs stlink-v2-1.cfg; the Discovery stlink-v2.cfg. If you get this wrong, you get an unhelpful error message:
...
Info : clock speed 950 kHz
Error: open failed
in procedure 'init'
in procedure 'ocd_bouncer'
Asking Google to help with this error really leads you down the rabbit hole! The ‘open failed’ error is reasonably generic and covers all manner of problems: accordingly most of the solutions suggested by the Internet are irrelevant.
Having started the daemon we can now issue the programming commands from a second shell:
$ telnet localhost 4567
...
Escape character is '^]'.
Open On-Chip Debugger
> init
> reset halt
target halted due to debug-request, current mode: Thread
xPSR: 0x01000000 pc: 0x08002e0c msp: 0x20001ce0
> stm32f1x unlock 0
device id = 0x20036410
STM32 flash size failed, probe inaccurate - assuming 128k flash
flash size = 128kbytes
Device Security Bit Set
target halted due to breakpoint, current mode: Thread
xPSR: 0x61000000 pc: 0x2000003a msp: 0x20001ce0
stm32x unlocked.
INFO: a reset or power cycle is required for the new settings to
        take effect.
> reset halt
target halted due to debug-request, current mode: Thread
xPSR: 0x01000000 pc: 0xfffffffe msp: 0xfffffffc
> stm32f1x mass_erase 0
stm32x mass erase complete
> flash write_bank 0 blackmagic.bin 0x2000
target halted due to breakpoint, current mode: Thread
xPSR: 0x61000000 pc: 0x2000003a msp: 0xfffffffc
wrote 70932 bytes from file blackmagic.bin to flash bank 0
        at offset 0x00002000 in 2.148439s (32.242 KiB/s)
> flash write_bank 0 blackmagic_dfu.bin 0
target halted due to breakpoint, current mode: Thread
xPSR: 0x61000000 pc: 0x2000003a msp: 0xfffffffc
wrote 7284 bytes from file blackmagic_dfu.bin to flash bank 0
       at offset 0x00000000 in 0.276390s (25.736 KiB/s)
> exit
Connection closed by foreign host.
At this point the firmware has been upgraded!
To check:
$ system_profiler SPUSBDataType | fgrep Black
   Black Magic Probe (STLINK), (Firmware v1.6.1-205-gc5c0783):
     Manufacturer: Black Sphere Technologies
Future upgrades
Having converted the ST-Link to a Black Magic Probe, you can upgrade the firmware with the usual USB DFU14 tools.
Tidying up
There are basically only a couple of tasks to do. Firstly power-up the soldering iron, and swap the solder-bridges on the underside of the board back to the ‘DEFAULT’ side, breaking the ‘RESERVED’ set. I usually end up with lots of flux residue at this point, and so clean the board.
Finally replace the two jumpers in CN2 so that the new Black Magic Probe can see the target ARM on the Nucleo board.
When that’s done, you can do a final check:
$ arm-none-eabi-gdb
GNU gdb ...
...
(gdb) target extended-remote /dev/cu.usbmodemB5C8D9E1
Remote debugging using /dev/cu.usbmodemB5C8D9E1
(gdb) monitor swdp_scan
Target voltage: unknown
Available Targets:
No. Att Driver
 1      STM32F401E
Note that you need to use the /dev/cu.usbmodem* device, not the /dev/tty.usbmodem* device.
Note too, that jtag_scan appears to fail:
(gdb) monitor jtag_scan
Target voltage: unknown
JTAG device scan failed!
Conclusions
In practice, if everything just works, converting the ST-Link portion of a Nucleo board to a Black Magic Probe takes about twenty minutes. The change is effectively permanent though, so if you want a normal Nucleo again talk to Digikey or Farnell.
References
- 1. https://github.com/blacksphere/blackmagic/wiki
- 2. ./bmp-nuc.jpg
- 3. https://github.com/blacksphere/blackmagic/wiki/Debugger-Hardware#sw-link
- 4. http://nuft.github.io/arm/2015/08/24/blackmagic-stlink.html
- 5. https://github.com/nuft
- 6. https://github.com/texane/stlink
- 7. http://openocd.org
- 8. http://esden.net/2014/12/29/black-magic-discovery/
- 9. http://www.taylorkillian.com/2013/01/retrieving-st-linkv2-firmware-from.html
- 10. https://lujji.github.io/blog/reverse-engineering-stlink-firmware/
- 11. ./nbot.png
- 12. ./ntop.png
- 13. ./ntop-host.png
- 14. https://en.wikipedia.org/wiki/USB#DFU
![[ Atom Feed ]](../../atom.png "Atom Feed")